Since the source info isn't in a public space, here are the parts required for a DIY cooler. You must buy the shirt. Info courtesy of Duct Tape Motorsports. >:]
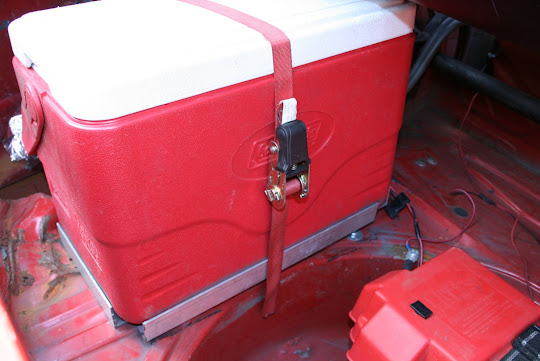
1 cooler of your choice, taller contains slosh better, unless you find one that actually seals. 16 Qrts is good for a solid 2 hours on one charge of ice.
www.westmarine.com
375188 – 1pc $21.99
360gph 12V Bilge Pump, 3/4" Port, 2.1A Draw, 2.5A Fuse, 3-1/2"H x 2-3/8"W
http://www.westmarine.com/webapp/wcs/st ... &langId=-1
www.radioshack.com
270-020 – 1 pc $6.99
Enercell™ 2-Conductor Automotive DC Accessory Cable
http://www.radioshack.com/product/index ... Id=3870003
Make sure the exposed pin is ground on the car side!
http://www.usplastic.com
Tube fittings:
64161 - 2pcs $5.75/ea
Acetal Shut-Off In Line Male Pipe Thread Fitting 1/4" Flow Inch; 3/8" MNPT Thread
http://www.usplastic.com/catalog/varian ... t_id=64161
64170 - 2pcs $5.44/ea
Acetal Shut-Off Insert Hose Barb Fitting With Shut-Off 1/4" Flow ; 1/4" ID
http://www.usplastic.com/catalog/varian ... t_id=64170
64156 - 2pcs $5.62/ea
Acetal Shut-Off In Line Hose Barb Fitting 1/4" Flow Inch; 1/4" ID
http://www.usplastic.com/catalog/varian ... t_id=64156
If you actually want to escape your burning car, these are a MUST:
65052 - 2pcs $7.21/ea
1/4" White I.D. ShutOff Inline Hose Barb Insert
http://www.usplastic.com/catalog/varian ... t_id=65052
65047 - 2pcs $7.95/ea
1/4" White I.D. Inline Hose Barb Body
http://www.usplastic.com/catalog/varian ... t_id=65047
Hose:
58063 - 20ft - $0.36/ft
1/4" I.D. x 3/8" O.D. x 1/16" Wall Superthane® Ether Based Tubing 67 PSI @ 70°F
http://www.usplastic.com/catalog/varian ... t_id=58063
61147 - 1pc $0.72 ( I used an additional one for the return but not required)
Nylon Tube And Hose Fitting 3/4" x 3/8"
http://www.usplastic.com/catalog/varian ... t_id=61147
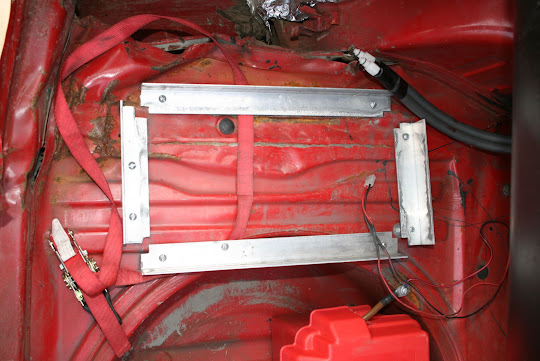
Use this to unload the pressure off the bilge pump mounting
64339 - 1 pc $0.50/ea
Black Nylon Elbow 3/4" Tube ID
http://www.usplastic.com/catalog/varian ... t_id=64339
27215 - 1pc $4.36/ea
Schedule 80; Gray 90 Deg PVC Threaded Elbow 3/8" Pipe Size
http://www.usplastic.com/catalog/varian ... t_id=27215
27035 - 1pc $1.07/ea
Close; 1" Lgt Threaded Pipe Nipples 3/8" Pipe Size
http://www.usplastic.com/catalog/varian ... t_id=27035
One fitting they don't have that you need to glue into the tank/cooler
4596K69 - 2pcs $5.86/ea
Thk-Wall Dark Gray PVC Threaded Pipe Fitting 3/8" Pipe Size, Coupling, 1-15/32" L, Schedule 80
http://www.mcmaster.com/#4596k69/=2xfq77
Hose Insulation (not cheap, but very nice)
4339T3 - 2pcs $7.83/ea
Weather-Resistant EPDM Foam Tube, 5/8" OD, 1/4" ID, 6' Length
http://www.mcmaster.com/#4339t3/=2xfrfl
Bilge pump requires 3/4" id tube for the output. Buy 1 ft of clear hose from HomeDepot/Lowes/etc.
Also will need a tube of marine epoxy for gluing in the fittings and electrical connections. Again HomeDepot/Lowes/etc.
Good collection of pictures here https://picasaweb.google.com/ScottBarto ... SuitCooler
DIY cool suit cooler parts list
-------------------------
2017 BMW M2
2017 BMW M2
Re: Cool Suit
Just regurgitating old info. Old prices/quantities listed. I'll let you do the math. IIRC the savings was around ~$50-$100.RealM3E30 wrote:Just curious, what are the total parts cost including freight and handling ?, the about time of putting that all that toghether compared to buying the setup ready to install, less the shirt. R
Also note: Not included in complete systems are the quick break couplers. Sort of scary to be leashed to a potential burning car.
-------------------------
2017 BMW M2
2017 BMW M2
Mine cost around $75-80 in parts. 16 qt cooler from Walmart worked great. I would however recommend the largest bilge pump you can get. Nothing less then 500-600 GPH. Quick connect fittings are available from West marine or McMaster.
Just make sure you come up with a secure way to tie it down. Otherwise, this is the result:
http://www.vimeo.com/26870803
Just make sure you come up with a secure way to tie it down. Otherwise, this is the result:
http://www.vimeo.com/26870803
FYI, I'd recommend the 500GPH pump for only a few $$ more. After a while your shirt and hoses can become clogged with nastiness, and slow the flow.
Also make sure you insulate those hoses inside the car. I did a 24 hour ChumpCar event this weekend at VIR and they didn't insulate the in car hoses. The cool shirt didn't get nearly as cold, and the water lasted less than half the time.
To make the ice last even longer, try wrapping the cooler in Reflectix from Lowes.
To see more pics of the Homemade cooler, you see here.
https://picasaweb.google.com/ScottBarto ... SuitCooler
-Scott
Like Duct Tape Motorsports on FB!
Ouch. Yeah dual tie downs for the cooler, and preferably mounted in the trunk. Aft of the rear wheels!ncoker wrote:Mine cost around $75-80 in parts. 16 qt cooler from Walmart worked great. I would however recommend the largest bilge pump you can get. Nothing less then 500-600 GPH. Quick connect fittings are available from West marine or McMaster.
Just make sure you come up with a secure way to tie it down. Otherwise, this is the result:
http://www.vimeo.com/26870803
I built mine over-sized with the 500gph pump.
McM for fittings is expensive.
-------------------------
2017 BMW M2
2017 BMW M2
I'll add a few notes since I used that system along with a home made shirt.
The DIY route allows you to use a much larger cooler that is typically offered with the commercial systems. For 24 Hours of LeMons, we got 3 to 4 hours (2 driving stints) cooling time in nearly 90 degree weather from a single load of ice cubes in our 30ish quart cooler.
The cooler was assembled using the standard non quick release fittings sued in most commercial systems because a couple guys already had shirts. I made my shirt with breakaway QD fittings and made adapter hoses to hook into the standard fittings so I could bail out faster. It would be cheaper and safer to build the system using only breakaway QD fittings. Make up one set of adapter hoses for anyone with a non-QD shirt. That way, they get the benefit of the QD fittings when their crapcan sets itself on fire
My shirt was a cotton t-shirt with clear 3/16" id tubing run up and down the back and front. The front and back circuits were joined together with tee barb fittings and run to 1/4" ID tubing to the QD fittings. The tubing was secured with strips of fabric cut from another cotton t-shirt. The whole contraption looked like a disaster but worked surprisingly well under my nomex underwear. If I do it again, I'll buy a nomex or FR cotton shirt and learn to use a sewing machine.
The DIY system is completely serviceable with parts available from a hardware store or home center. The only parts that can't be found at WalLowesDepotMart are the quick disconnects so pick up a spare male and female and throw them in your tool box.
I don't think dual tie downs is necessary. I just made a mounting bracket out of angled aluminum and one tie down. Haven't had any problems. Just make sure you don't over tighten the strap. It will deform the lid and make it leak.mmarv wrote:Ouch. Yeah dual tie downs for the cooler, and preferably mounted in the trunk. Aft of the rear wheels!ncoker wrote: Just make sure you come up with a secure way to tie it down. Otherwise, this is the result:
http://www.vimeo.com/26870803
-Scott